Valve Spacers

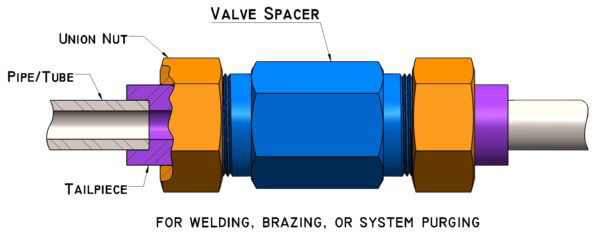
CPV Valve Spacers are the exact face-to-face dimension of CPV O-SEAL® valves. They can be used to protect valves during installation, and can be reused again and again for maintenance operations.

CPV O-SEAL® valves provide years of reliable service. However, the heat of welding or brazing during installation can compromise the cleanliness and/or integrity of the O-SEAL® valve. Using CPV’s hollow core valve spacers enables users to avoid that risk. These spacers replicate the exact face-to-face dimension of the O-SEAL® valve being installed. After welding or brazing has taken place, the entire system can be flushed. The spacer is then slipped out and the valve slipped in. Users are thus assured of both a perfect fit and a leak-proof connection for years to come. Moreover, once the O-SEAL® valve is in service, the valve spacer can be saved and re-used over and over again. For example, if flushing the system could cause problems or contaminate the O-SEAL® valves, users simply slip the valves out and slip the spacers in.

To order, enter the letter “F” in front of the part number for the CPV O-SEAL® valve you are installing. Be sure to specify the complete part number for each spacer you wish to order, including the size code or “dash” number. For example:

  • F-380-3 (spacer for Globe Valve No. 380-3, size 1/2”)
  • F-381-4 (spacer for Angle Valve No. 381-4, size 3/4”)
  • F-123A-5 (spacer for Check Valve No. 123A-5, size 1”)
Valve Lubrication

A smooth operation depends on well greased valves.

Plant managers don’t always remember to schedule the valves in a system for regular lubrication. The movement in a valve may only involve opening and closing, but that doesn’t mean valves don’t require the same lubrication as more complex, multipart components. Whenever two surfaces must slide over one another, as they do in even the simplest valve, lubrication makes parts last longer and function more efficiently.

Hydraulic piping systems are generally not of concern because they usually have sufficient lubricity. On the other hand, lubrication can be critical in gas piping systems which function under high pressures.

When valves are ordered from CPV we strongly suggest that a lubricant be specified that is compatible with the system in which the valve will be used. As a result, seals and stem threads will be properly lubricated before the valves are shipped.

Once operational, CPV recommends a regular lubrication schedule be established. CPV Technical Support can help customers set this up, if necessary.

As often as not, lubrication can be as simple as opening the valve and smearing lubricant on the stem. When a regular lubrication schedule is adhered to, maintenance takes less time, the number of emergencies decreases and the piping system lasts longer.

CPV has been a leading manufacturer of valves and fittings since 1915. The company’s innovative designs are well suited to standard applications, as well as one-of-a-kind custom requirements.

Valve Flush Plugs

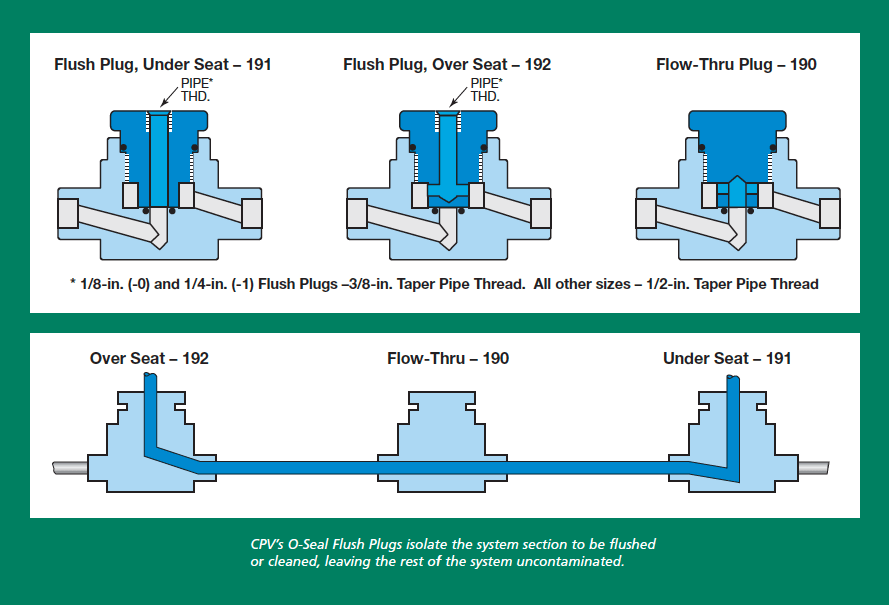
If one section of a piping system needs to be altered, cleaned or flushed, CPV O-SEAL® Flush Plugs can be used to protect the rest of a system from contamination. Simply remove the valve cartridge and insert the appropriate Flush Plugs into the O-SEAL® valve bodies at either end of the affected area and the rest of the system will be totally cut off from the cleaning or flushing process.

There are three types of flush plugs available: Under-Seat, Over-Seat, and Flow-Thru.

As can be seen in the schematic drawings, the Over-Seat and Under-Seat have threaded connections in the top of the plug for trouble-free connection to the flushing pump. The Flow-Thru Plugs are intended for insertion in valves located in the middle of the section being flushed or cleaned. Once installed, these plugs allow the flush to flow through without contaminating the O-SEAL® valve cartridges. When these valve bodies are equipped with O-SEAL® Flush Plugs, future system expansion or section flushing will be much easier.

O-SEAL® Valve Installation, Operation, Disassembly Instructions

Instructions, CPV O-SEAL® Valves, 6000 PSI W-O-G Service

INSTALLATION OF FITTINGS OR VALVE END CONNECTIONS – It is essential that the mating metal surface be in perfect contact and alignment to prevent extrusion of the O-ring under high pressure. To achieve this, the O-ring should be removed and a hand tight connection made before welding or brazing the tailpiece and threaded piece onto the pipe ends. As O-SEAL valve manufacturers, we recommend use of a welding spacer (see Valve Spacers) for installation. If the valve is used as a spacer, internal parts should be removed to prevent damage from heat of welding. After completing union connection of both ends of the pipe, break the connections…insert the O-rings…and remake the unions


INSTALLATION – CPV hand-operated valves should not be subjected to the heat of welding or brazing. Welding spacers should be used, or the disassembled valve body.


OPERATION – CPV Shut-Off and Needle Valves are guaranteed to give bubble-tight shut-off and to be leak-proof at all connections. If any leakage occurs, the valve is constructed to permit easy inspection and maintenance. External thread design permits thread-lubrication without contaminating the fluid.


INSPECTION – To Disassemble: Remove Bonnet (B) which has LEFT-HAND THREAD. All valve parts are in the Bonnet assembly. To remove Seat (E) hold Bonnet and turn Handle clockwise. This will push Seat from its press fit. Remove Handle (A). Remove Gland Nut (F) from Bonnet and Stem (C). Push Steam and Guide Assembly (D) free from Bonnet.


To Correct Leakage: For tight seating, O-ring (N) and the seating surfaces on the Guide and Seat should be inspected for foreign material or surface imperfections and replaced if damaged. Leakage at Stem: Stem Seal (K) and steam sealing area should be inspected, and replaced if damaged. Care should be taken to prevent damage to edges of the Stem Seal when replacing, and the grooved end of Seal must face valve seat. Leakage at Bonnet: O-ring (L) and Back-up Ring (m) should be replaced.


TO ASSEMBLE – The pieces should be replaced in the reverse order of disassembly. The Seat should be carefully tapped into the press fit in the proper position. Light wrenching of Bonnet into final position is all that is required.

If you want to learn more about fitting installation and operations, contact our O-SEAL valve manufacturers at CPV.