O-SEAL® Valve Installation, Operation, Disassembly Instructions
Instructions, CPV O-SEAL® Valves, 6000 PSI W-O-G Service
INSTALLATION OF FITTINGS OR VALVE END CONNECTIONS – It is essential that the mating metal surface be in perfect contact and alignment to prevent extrusion of the O-ring under high pressure. To achieve this, the O-ring should be removed and a hand tight connection made before welding or brazing the tailpiece and threaded piece onto the pipe ends. As O-SEAL valve manufacturers, we recommend use of a welding spacer (see Valve Spacers) for installation. If the valve is used as a spacer, internal parts should be removed to prevent damage from heat of welding. After completing union connection of both ends of the pipe, break the connections…insert the O-rings…and remake the unions
INSTALLATION – CPV hand-operated valves should not be subjected to the heat of welding or brazing. Welding spacers should be used, or the disassembled valve body.
OPERATION – CPV Shut-Off and Needle Valves are guaranteed to give bubble-tight shut-off and to be leak-proof at all connections. If any leakage occurs, the valve is constructed to permit easy inspection and maintenance. External thread design permits thread-lubrication without contaminating the fluid.
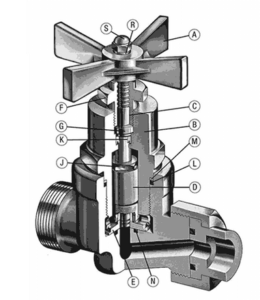
INSPECTION – To Disassemble: Remove Bonnet (B) which has LEFT-HAND THREAD. All valve parts are in the Bonnet assembly. To remove Seat (E) hold Bonnet and turn Handle clockwise. This will push Seat from its press fit. Remove Handle (A). Remove Gland Nut (F) from Bonnet and Stem (C). Push Steam and Guide Assembly (D) free from Bonnet.
To Correct Leakage: For tight seating, O-ring (N) and the seating surfaces on the Guide and Seat should be inspected for foreign material or surface imperfections and replaced if damaged. Leakage at Stem: Stem Seal (K) and steam sealing area should be inspected, and replaced if damaged. Care should be taken to prevent damage to edges of the Stem Seal when replacing, and the grooved end of Seal must face valve seat. Leakage at Bonnet: O-ring (L) and Back-up Ring (m) should be replaced.
TO ASSEMBLE – The pieces should be replaced in the reverse order of disassembly. The Seat should be carefully tapped into the press fit in the proper position. Light wrenching of Bonnet into final position is all that is required.
If you want to learn more about fitting installation and operations, contact our O-SEAL valve manufacturers at CPV.